Show images of the selected variant on Shopify Product Page
A comprehensive guide to improve your conversions
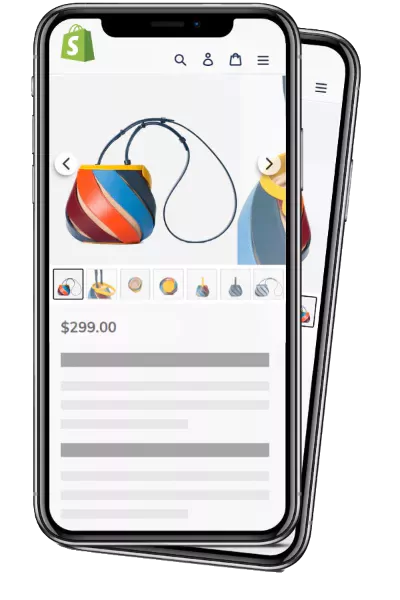
Welcome to a tutorial that focuses on allowing you to only show images of the selected variant on your Shopify Product Page.
It’s a relatively unknown but truly powerful feature that lets you customize which variant images of your products get displayed based on the product variant chosen. Essentially, it eliminates redundant product images, making your store's UX cleaner and more streamlined.
The Default Shopify Product Page Behavior

By default, Shopify will display all the images of your product, irrespective of the product variant selected. If you switch the variant from one color to another, you'll notice that there's no change in the displayed images. For instance, for a shirt with denim and multicolor variants, whenever you switch to the 'Multicolor' variant, you still see all the images of the denim shirt littering your storefront. Our feature lets you dictate only the related variant images to be displayed. It's an especially priceless feature for stores with a multitude of product images and variants for each product. From a customer's perspective, navigating a gallery with minimal, relevant images significantly improves the shopping experience and reduces shopping time.
How to show only selected variant Images in Shopify

To begin your customization, presume a scenario where your product has six images with two color variants. What would be the steps to harness the power of the ‘Variant Images’ feature to provide a better customer experience? Let’s dive in!
Step 1: Add GG Product Page Slider App

The first step is obviously to add our app to your storefront. Follow through with the whole installation process as per the detailed guide provided in the previous installation tutorial video.

Before proceeding further, always ensure that the app is properly installed.
Step 2: Configure Variant Images
Once the installation is done, revisit your Shopify settings. To tweak these settings:
-
Assign an Image for each color variant. In this case, the very first image will be assigned as the ‘Multicolor’.
-
Arrange the order of images such that similar variant images are grouped together. For example, all 'Multicolor' images should be adjacent to each other. Ensure other variant images are also in the right order.
-
Lastly, select the 'Denim' featured image.
-
Save the changes to your shopify settings.

Refresh your product page to see the images in the new order.
Step 3: Apply The Variant Images Feature

Once your changes have been successfully saved, navigate back
to our app settings. Find the 'Variant Images' tab,
select the option and apply changes.
The Result: only selected Variant Images are shown

The changes to your storefront should now be noticeable. Whenever you select a variant of your product, only relevant variant images will be displayed. For the denim color, you should only see the three images of the denim color variant. The multicolor variant will exhibit similar behavior. There you have it, folks! I hope you find this guide helpful in enhancing your customer’s shopping experience. Do watch out for our other tutorial blogs. Until next time, happy selling!
5.0
(240+ reviews)